Tag Archives: Morris Jenkins

Any home can have a plumbing leak

plumbing repair

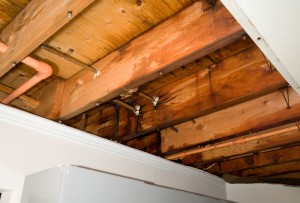
Any home can have a plumbing leak appear silently and invisibly. It can sometimes take days, even weeks to see the stain, puddle or leak. They can have ugly, costly, damaging results, especially if not discovered quickly enough.

To prevent the replacement of walls, ceilings or floors, projects than can cost thousands in a worst case scenario, it is best to discover how to detect leaks before they begin causing a scope of problems this big. Your home plumber in Charlotte NC can help with this task.
Begin By Tracking Your Water Meter Readings

Your water meter is there for very good reasons. It can help you discover if you have a leak somewhere in your home. To determine this, simply shut off all faucets and water-using appliances. Don’t flush the toilet during this time. After an hour, see if the water) meter reading has changed. If so, you may have a leak.

Next you should check all of the hose connections on all of your water-using appliances. Check them for bulges, drips, cracks and be certain they have a firm seal and connection. Feel and observe the floors under any of these appliances as well. Feel for wet spots and look for discoloration and dampness around or in cabinets and walls near the appliances as well.

Your home plumber in Huntersville NC will make a thorough investigation for leaks. The plumber will check tiled walls and floors, looking for missing or damaged grout. He will check for broken, cracked or missing shingles on your roof. He will also check the basement floor for any fissures or cement foundation movement – all signs that plumbing may have moved or shifted which leads to cracks, leaks and long-term damage.
Repairing Leaks Immediately Keeps Your Water Bill Down

The amount of money you save by repairing a leak will often pay for the cost of your home plumber in Huntersville from Charlotte plumbing & repair.

We will not only repair any leaks, we will also provide you with leak detection equipment so your water costs will remain under control from then on.

If you feel you can handle the repair on your own but need guidance, simply give us a call and we can talk you through it. Remember,detecting leaks early-on is critical.
Call Your Home Plumber: Charlotte Chooses Charlotte Plumbing & Repair.

Your home plumber in Charlotte is a family-owned business that has been serving the plumbing needs of Charlotte, NC for almost 20 years.
Charlotte Plumbing & repair Plumbers know how critical water waste is. This critical topic of discussion has only grown as Americans continue using huge quantities of water in their homes every day.

How much water is considered a huge amount? According to the Environmental Protection Agency (EPA), average American families with a minimum of four in the household use up to 400 gallons of water a day. This number is not connected to watering lawns and gardens – 70 percent of American water use is within the home.
A Few Water Facts

According to National Geographic the average American lifestyle is kept afloat by about 2,000 gallons of water a day including watering of lawns and washing of cars in the driveway— and this is actually twice the global average.

This doesn’t include the water people are drinking out and about during their day, or using when frequenting restaurants and others venues of entertainment.

The important thing to understand about why to save water, beyond what it costs in a month, is the need to pledge to cut your water footprint, so as a nation we can help restore our freshwater ecosystems.
Of course, the bathroom is where most water is always used. Every activity in your bathroom utilizes lots of water. Example: the average toilet uses up to 27 percent of all household water. Save 200 gallons a month by simply turning off the faucet while brushing teeth.
At Charlotte Plumbing & Repair your home plumber in Charlotte, NC, we provide every available plumbing update or repair service available in order to reduce your water waste and cost.
Plan To Schedule A Water Use Audit

We’ll analyze the usage in your home, and then discuss your daily lifestyle requirements and habits with you. We will then customize an efficient and simple plan to help reduce your daily water use and cost.

Whether it is your leaky washing machine hookup or a clogged drain, we will show up any time, day or night, for your overflowing toilet. For all plumbing repair emergency

Inquire about our other service contracts so that you, too, can be proactive with your home plumber in , Charlotte, NC.

Do-It-Yourself Plumbing Repair Tips

The Most Common Plumbing Problems and When to Call a Professional
Almost every homeowner or renter has a few essential tools on hand to cope with minor plumbing emergencies. Many times, a clogged toilet or slow drain may need a little elbow grease and a plunger to work as intended. If you’re handy around the house, you can generally tackle a small repair such as changing out a worn washer or replacing a drain cover. However, bigger plumbing repair jobs need professional plumbers charlotte nc. Trying to repair some common issues such as slow drains or leaking toilets could lead to bigger problems later.

Plumbing Maintenance
One way to prevent costly repairs to your home is a regular maintenance schedule. Because many issues with your pipes sneak up on you, a thorough inspection is the key to catching small problems before they grow. Hidden leaks in sink drains or below water heaters are more than just a nuisance; over time, they can cause structural damage. Water that seeps into sheet rock or plaster contributes to mold growth. Porous tile or wood flooring can discolor or warp when wet.

Many routine maintenance tasks are simple do-it-yourself jobs. An inspection is the foundation of any maintenance schedule. You may use your sinks and tubs daily, but you might not notice minor concerns unless you set aside time for an inspection. Go through your home and take a look at your plumbing. Examine all exposed pipes, including under sinks and behind toilet tanks, for any signs of moisture. On a humid day, some condensation on a cold metal pipe is normal, so note any dampness and check the pipes again when the home is cooler. Check for signs of corrosion on brass or copper fittings; corrosion occurs more rapidly on damp metal, so corroded connections could reveal a slow leak.

Turn on water faucets in sinks, showers and tubs to monitor water pressure. Some variation between different faucet styles and purposes is normal, but all of them should have a steady flow. Note how quickly the water drains after you test the faucet, too; slow drains could mean a clog waiting to happen. While you’re making your rounds, flush toilets to ensure they don’t run or leak at the base, a sign of a faulty wax seal.

Inspections from a certified Charlotte, NC, plumber give you a more in-depth look at your home’s pipes and drains. Your inspector will check the water heater, garbage disposal and every area of your home’s plumbing system. More thorough assessments might include remote video inspection of pipes, lead testing and filter system inspection.

After a thorough inspection, remove and clean aerators on faucets and shower heads. Sediment can build up and slow water flow. If you opt for professional plumbing maintenance, your plumber will take care of this step and others for you. Some of the maintenance duties a licensed plumber can perform include:

treatment to maximize flow rate
cleaning of garbage disposals and water heaters
pressure tests to detect hairline leaks
water pressure assessment and adjustment
Common Plumbing Repair Jobs
Even the most thorough plumbing maintenance inspection won’t prevent the occasional clog or leak, especially in older homes. The clay soil in the Charlotte, North Carolina, area also contributes to septic system problems that can affect toilets and drains. Many of these common issues have equally common solutions.

Dripping
If you’ve ever tried to fall asleep with a dripping faucet in the next room or wrestled with a kitchen sink that didn’t know when to stop, you know how annoying this common problem can be. A dripping faucet also drives your water bill higher. A single faucet can send hundreds of gallons of water per year down your drains a drop at a time.

Water entering your home is under pressure to move it through the pipes. When you turn off the tap, rubber or silicone-based washers form a water-tight seal that prevents more water from pushing its way through the pipes and out of the faucet. Over time, washers can become stiff, torn or dislodged, allowing a tiny trickle of water through and creating that annoying drip. While you can replace washers yourself, the repair job can be more of a challenge than you might expect without specialized tools. If the leak has gone on long enough, the valve seat may become worn or corroded, necessitating a more involved repair that’s best left to a professional plumber.

Not all sinks have washers to hold back the flow of water. Ceramic taps, also called disc or canister taps, use durable ceramic plates that fit together to form a seal. Although they need maintenance less often than rubber washers, the repair job is more complex than a simple washer replacement. If you have a lever-operated sink or tub instead of one with separate knobs, you probably have a ceramic disc or canister tap.

Low Water Pressure
When water that should gush only trickles from the tap, you have low water pressure. This problem might not be related to the pipes in your house but to the municipal water supply. It’s rare, but a break in a main line can temporarily reduce your water pressure. A more common cause of this problem is a build-up of deposits or sediment on faucet aerators.

The water entering your pipes carries dissolved minerals in it that eventually deposit themselves on metal surfaces. If you have a filtration system, these deposits wind up in the filters and get changed; without such a system, these mineral deposits collect on inner surfaces of aerators and shower heads, clogging screens and slowing flow. Most kitchen faucets have easily removed aerators that just unscrew from the tip of the faucet for easy cleaning. Taking off the aerator and soaking it overnight in a vinegar solution will generally dissolve the calcium deposits common in Florida water supplies. Shower heads and bathroom faucets may not be as easy to remove, but you can affix a plastic bag filled with vinegar to the shower overnight to clean it.

If you still notice low water pressure after cleaning aerators and shower heads of sediment and deposits, you might have a more complex issue. A leak or breach in pipes leading into your home is an emergency that could damage your home’s infrastructure or foundation. Sudden and significant reduction in water pressure with no known cause merits a call to a licensed plumber who can pinpoint the reason for the change.

Running Toilet
If you’re tired of jiggling the handle to make your toilet behave after flushing, it might be time to replace its inner workings. Toilets typically run when the flapper valve that lets water pass from the tank to the bowl no longer fits properly, the float is imbalanced or the fill tube comes loose. Toilet repair kits work for most models and require little effort to install.

Occasionally, though, run for more complex reasons. If you’ve replaced the flapper, float apparatus and fill tube, you may have sediment that’s affecting proper flushing and filling. Higher water bills could also indicate a silent leak. To detect a silent leak in your toilet, add a few drops of food coloring to the upper tank and wait 15 to 20 minutes. Look in the bowl for any hint of color; if you see tinted water, your flapper valve isn’t working as it should.

Leaky Pipes
Whether your regular inspection reveals a puddle under a pipe or you get an unpleasant surprise when you reach under your sink, leaks can be a costly nuisance. Leaks usually happen at joints, which is why commercial joint fillers and fitting compounds occupy plenty of shelf space in your local hardware store. These products are a temporary fix, though; a permanent plumbing repair may mean replacing a length of pipe or its fittings.

Although replacing a leaky U-joint under your sink isn’t a complex repair, it is a messy one. You may want to have a professional handle it for you to save the clean-up time. Until the plumber can get to your leak, use a compression clamp and a rubber sheet or leak tape. These temporary repairs keep water from spraying but are easily removed when it’s time for a permanent solution.

Slow or Clogged Drains
When the water that goes into your sink, tub or toilet won’t go out, you probably have a partial or complete clog. In many cases, your trusty plunger can fix the problem. Plungers use air pressure to dislodge a clog, but they can’t remove it entirely. Commercial drain cleaners and clog removers are safe for most drains for occasional use, but these caustic materials can damage some pipe materials if used too frequently. If you’re dealing with clogs on a regular basis, it’s time to call a pro.

Even if you don’t have a complete clog, debris in pipes can slow drainage to a trickle. Shine a flashlight into the drain and see if you can spot the problem. A pair of pliers or tweezers might be able to reach a clump of hair or fallen bottle cap that’s obstructing your pipes. Installing drain screens can prevent detritus from finding its way into drains.

Do-It-Yourself Plumbing Repair Clogged Drain,Commercial Plumbers,Commercial Plumbing Companies,drain cleaner,Drain Cleaning Services,Drain Cleaning, Emergency Plumbers,Emergency Plumbing,  Drain Emergency Plumbing, And Drain Cleaning,Find A Local Plumber,Garbage Disposal,Home Plumbing,Licensed Plumbers, Pipe, Drain Cleaner,Plumbe,rPlumbers,Plumbing,Plumbing And Drain,Plumbing And Drain Cleaning,Plumbing Clogs,Plumbing Installation,Plumbing Repair,Plumbing Services Available,Plumbing Technician,Residential And Commercial Plumbing,Residential Plumbers,Sewer And Drain Services,Sewer Cleaning, Machinesewe,r drain cleaning,Sink Repairs,Toilet,Toilet Repairs,Water, Heater Water, Heater Repairs,

Before tackling any repair, turn off the water main.

Dress to get wet. Even if you’re careful, plumbing maintenance and repair is a messy task.

The adage to measure twice and cut once applies to pipes, washers and other fittings as well as to carpentry. When possible, take parts to be replaced to the hardware store with you to be sure you’re buying the right item.

Keep a professional plumber’s number handy (704) 394-5252. You may not need the number, but if you snap off a valve and have a geyser in your kitchen, you’ll be glad you kept it near your phone.

When to Call a Professional Plumber
Some issues are too dangerous or complicated to tackle alone. Hire a certified Concord, NC plumber for the following tasks for your safety and the integrity of your home:

installation of new pipes, sinks or tubs
water heater problems
new construction that requires building permits
septic tank leaks
sewer line breaks or leaks
If you have questions, want to schedule a maintenance visit or have a repair emergency, contact Charlotte Plumbing & Repair.
plumbers charlotte nc,plumber charlotte nc,
Remodeling and Home Design

Plumbing vent types & Terms

Posted by: Charlotte Plumbing & Repair

Vents play a vital component in a home’s drainage program. A faulty venting program will not only trigger aggravation when the drainage system malfunctions, it could also make you and your loved ones ill if it compromises the seal that traps are supposed to maintain against sewer gas. It really is to recognize the various venting choices doable, at the same time as size and installation basics, in the event you program to alter or add your current method.

Venting Types and Terms:
Here are a couple of of essentially the most widespread kinds of events you will uncover within the home.

Vent Terminal: a vent terminal is roughly equivalent to the distance between floors, but as a result of layout considerations, it frequently starts a foot below one floor and ends of foot below the next.
Broken vent: the term broken vent refers to an improperly installed vent that, consistently is ineffective. A broken vent is a small far better than no vent at all.

Stack Vent: vertical drainage stacks are also considered events since furthermore to carrying water, they pull relief air from above the roof. Short horizontal branch lines extending from a vertical stack don’t need extra venting and therefore, are said to be stacked vented.

Vent Stack: a vent stack is a vertical stack installed from the sole purpose of providing relief air. It doesn’t carry water. A vent stack could be tied into the Stack vent above the highest fixture or exit the roof independently.

You may have observed plumbing diagrams within the past with vent stack beginning below the lowest fixture on the stack and continuing into the attic. All fixtures are shown connected to the Stack vent. Nonetheless, dedicated program wide vent stacks are rarely identified in residential installations. They work best in tall commercial buildings

Stack-Vented Branch Arm: in a correctly created method, fixture drain lines are sized so that they are able to by no means run a lot more than one half full. If a horizontal branch pipe isn’t too lengthy unused best half of the pipe can serve as a bank. It feeds air from the stack to the back of the flow, preserving the trap seal. But such a stack prevented branch arm is limited.

The branch need to serve the highest fixture or fix your combination on the stack. This highest fixture rule applies to every individual stack, even when the highest fixture on a second stack is really a floor or two above or below that of the primary stack, supplying that all stacks extend to the open air above the roof. This nevertheless, can have an exception: rules do not apply to a basement bathroom due to the fact most of that piping is horizontal.

The length of the branch should not exceed the limits established by code. The bigger the pipe diameter, the longer the allowed length for the pipe. For instance, most codes specify that 1 a half inch diameter branch arm can extend 5 feet from the stack to the trap, even though numerous further limit that to 3 1/2 feet. Most codes permit 8 feet for it to winch line and 10 feet for 3 inch line. You have to present something longer.

Re-vent: a revamped is really a vent added to a fixture drain when the primary vent is broken in some way. When a branch arm is too lengthy, for instance, when it should step up to accommodate structural barriers, you have to install a re-vent.

Wet and Dry Vents: a wet vent carries water too as air via some component of it piping. A basement bathroom provides a superb example for this simply because the vent for the toilet line also carries water from the tub and laboratory. Although wetlands are handy and efficient, they have their limits. Simply because air ought to share space with water, what vents are low volume vents. They can’t vent many fixtures. The drive vent does not carry water, so it has greater fixture capacity.
Widespread vent: a typical vent is really a single vent pipe that offers relief air to bore fixtures on the single branch line. When you are venting two fixtures on a single branch line, you have to location a typical event between the train outlets. When you are venting far more than to fixtures, install the vent between the last and second to last fixture outlets.

Loop Vent: you need to install a sink in the kitchen island; a conventional vent will not work. In this scenario, a loop vent may be the appropriate kind of vent to use. Loop vents simply handle the low volume fixtures and (like kitchen sinks) which can be installed in island cabinets.

Loop Vents do not extend to open air or tie into stacks or vent stacks. I have no direct, fresh air connections. Rather, and also the volume of air within the piping loop gives the required pressure relief. For this reason, Loop vents are also recognized as barometric vents.

Automatic Event Device: a nonmagnetic device can take the place of a loop vent. It consists of an inverted cup with the spring-loaded diaphragm. This spring permits the piping method to pull air from the cabinet space but keeps gas from escaping. It’s basically a type of check valve, permitting air to flow in only 1 direction.

Although automatic vent devices might be program savers, do not use them where it is feasible to install conventional fence. Since automatic bands have limited capacity, do not use them to vent high-volume drains or to vent much more than 1 fixture. Install them to ensure that they always remain accessible since they can wear out and might want replacing.

Plumbing Repairs

plumbers and heating technicians free ads

5 kitchen counter upgrades You Can DIY

It’ll take some doing, but if your confident with your DIY skills you can make a kitchen counter upgrade with solid results. How? With step-by-step help from the pros at This Old House, of course. Here are our top projects to help you along. -Tabitha Sukhai, thisoldhouse.com

1. Install a Soapstone Countertop

best charlotte plumber

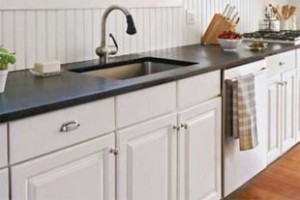
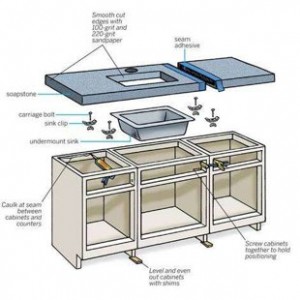
Too often the price of granite or engineered stone is out of reach of the average renovation budget. Not soapstone. This traditional kitchen topper is easy for a do-it-yourselfer to install, meaning you could save big on the labor, which usually accounts for half the cost. Available to be shipped nationwide from companies such as M. Teixiera Soapstone, where this counter came from, and starting at less than $25 per square foot, soapstone is a great, inexpensive DIY project.

470_2736507

Relative to other stones, soapstone is soft enough that it doesn’t require special tools to machine it. You likely already have what you need to cut and shape it: a circular saw, a jigsaw, a drill/driver, a grinder, and a sander. Here’s How to Install a Soapstone Counter in just an afternoon or two.

2. Install a Butcher-Block Countertop

470_2736510

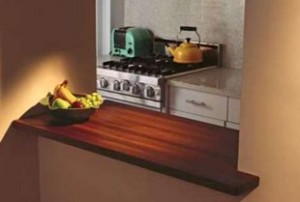
Sleek granite and sharp stainless. It looks all luxe and modern-and maybe just a little bit, you know, cold. So what to do if you want more warmth in the heart of the home? Cozy things up with rich-looking butcher block. Not only are its well-oiled tones welcoming, it’s easy to install, as we demonstrate in How to Install a Butcher-Block Counter. Just order it to size, and then fasten it down. In hours you can turn a chilly steel-and-stone room into a charming cook’s corner.

3. Create Portable Workspace With a Butcher-Block Island

470_2736525

If you’re going for homey and cozy in your kitchen, skip the built-in cabinet-base island and instead make the central work area a furniture like table with a butcher-block counter. Because these thick wood-slab tops have their edge or end grain exposed, they are stronger than wood laid on the flat. That means they resist warping and nicks better than laminate and almost as well as stone.

With this durability comes an old-fashioned warmth. The trend for wood and furniture in the kitchen is in full swing, and butcher-block islands mimicking 19th-century worktables are perfect for toning down the coldness of stone counters and metal appliances in modern cook spaces. You can bring this classic aesthetic to your kitchen by constructing a prep island from easy-to-buy materials or choosing one of the dozens of styles available through retailers and furniture makers. Whichever path you choose, you’ll end up with an island that can be at the center of the cooking action and still take whatever you can dish out. Here’s How to Build a Butcher-Block Island in 5 steps.

470_2736526

Here’s another variation on this style, which combines iron threaded pipe and butcher block to create a kitchen center piece. Get the steps.

4. Other Kitchen-Counter Hacks: Remove Spots from Kitchen Countertops

470_2736528

“Stones are basically sponges,” says Fred M. Hueston, director of the National Training Center for Stone and Masonry Trades, in Longwood, Florida. He’s working in a kitchen, mixing up an odd-smelling poultice of flour and hydrogen peroxide in the hope of removing a stubborn coffee stain from an island countertop. Spread over the stain, the paste should literally pull the discoloration out of the red travertine. “Granite, marble, and limestone consist of interlocking mineral crystals with pores between them,” he explains. “So spills soak into unprotected stone in just 15 to 20 minutes for granite, and 30 minutes to an hour for marble and limestone.” The liquid evaporates, but a mark remains.

Hueston, who literally wrote the book on the subject of stone restoration (Stain Removal Guide: For Stone, Tile, and Concrete), will leave the poultice in place for 24 hours. This will allow it to “wick” the stain out of the countertop, in the same way that poultices made with other ingredients pull oil stains out of concrete or venom out of snakebite victims. He determines his recipe on the basis of the stain and stone types: an absorbent base like dry clay, flour, or a paper towel, and a wicking chemical such as detergent, bleach, or hydrogen peroxide. If the countertop has been both stained and etched, the stone must be polished and a new sealer applied. “Cleaning spills right away and using coasters is a lot easier,” he says. See all the steps here.

5. Other Kitchen-Counter Hacks: Install Under cabinet Lighting

470_2736533

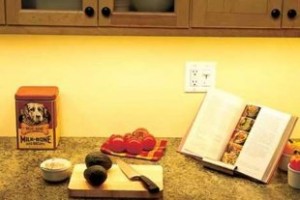
There’s a missing element in most American kitchens, and it’s not a $7,500 range or a 4-acre refrigerator. No, it’s simply good lighting. And a well-lit kitchen begins with undercabinet task lighting. These hidden fixtures, which are fairly easy to retrofit beneath upper wall cabinets, bathe the countertop in bright white light-a boon for everything from dicing veggies to reading recipes. Connect the fixtures to a dimmer switch, as shown here, and you also have the key to dramatic accent lighting or a night light for midnight snackers.

If you’re a bit tentative about working with electricity, don’t worry. This installation is simple and shock-free, as long as you cut the juice at the breaker box first. Get the rest in How to Install Undercabinet Lighting.

http://www.thisoldhouse.com/toh/kitchen-countertops

Valves: The Control Freaks of Your Plumbing

:

:

The idea is simple: Keep the water from coming out when you don’t want it to, and when you do want it to come out, be able to control the flow. There. That’s what your valves do for you. While valves may not seem like something you want to think about in the course of your daily life, there are times when, for some homeowners, they take a front and center place in one’s thinking. Let’s look at some examples:

You are building a new home or remodleing your bathroom and you come to the fun part of getting to pick out what style of faucets you want to decorate with. Those faucets? They’re just fancy looking valves.
When you hit the flush handle of your toilet and nothing happens that’s usually going to be a valve issue. Either the fillvalve (old timers know it by the name “ballcock”) is not working right or that very simple valve known as a “flapper” is misbehaving.
That dripping hose spigot on the outside of your house is a valve (old timer name: sillcock). By the way, charlotte plumbing repair can fix or replace that. . . just sayin’.
You smell a gas leak in your home. Someone will need to turn a valve off to stop the flow of gas. In fact, it could be a gas valve that is causing the problem. Did you know that licensed plumbers like Charlotte Plumbing & repair are the ones who find and repair the vast majority of gas leaks in homes? It’s true.

There are lots of other valves in your home, of course, such as those under your sinks, on your water heater, at your water softener, sump pump, etc. Valves are great friends when they are not leaking and are easy to turn on and off, but no one likes to find out that a valve is too corroded to use when the time comes.
If you don’t know anything else about the valves in your home, make it your mission to know about this one: The main water shut-off valve. This is the one that turns the water on or off to your entire house. Your main valve is the one you can go to in a plumbing emergency to stop the pressurized flow of water into your home. If you don’t know where it is located or whether it is working properly, find someone who will locate it for you and try it out to make sure you can turn it easily plumbers.
Lastly, if you’d like to know that your valves are in good working order and would like to have someone familiarize you with your main water shut-off, you can always call Charlotte Plumbing & Repair to come out and do that for you. Http://www.charlotteplumbingsvc.com

Dishwashers Need TLC Too!

Out of all the modern conveniences in our homes today, the one that saves us the most time, energy and labor while making our lives easier is the kitchen dishwasher.
tlc  www.charlotteplumbingsvc.com  Not having to wash and dry a sink full of food encrusted pots, pans, glasses and dirty dishes after every meal is more than a real time saver, it’s a life saver. Dishwashers were once considered luxury items, but those days are long gone and today they are an absolute necessity in any modern kitchen.
We ask them to do our dirty work for us every day and they seem to last forever, yet they never complain, whine or argue about being overused, underappreciated or neglected. In fact, because they’re so faithful, obedient and dependable we tend to take them for granted.
Well, we’re here to tell you that Dishwashers Need TLC Too! Dishwashers may be low maintenance, but they’re still mechanical appliances and like all appliances, they work better, look better, smell better and last longer with a little TLC. With just a little attention, the working life of your dishwasher can be extended to give you better smelling, better looking, more energy efficient and cleaner pots, pans, glasses and dishes.
Quick & Easy Dishwasher Cleaning & Maintenance Tips
dishwasher how toFollowing these tips will help your Dishwasher be energy efficient, smell fresher, stay cleaner and keep it running smoother for years to come.
General Maintenance Tips*

Make Sure Your Dishwasher is Level – If your dishwasher isn’t level, it could leak. To check, open the door and place an air-bubble level along the edge inside. If the dishwasher isn’t level, raise or lower either side by adjusting its “feet” or add a wedge to balance correctly.
Check Gaskets for Cracks and Deterioration – These are the rubber or plastic seals along the dishwasher door that provides a water-tight seal when you close. If you start noticing water around your dishwasher, it could be due to faulty gaskets. If the gasket is damaged, remove it by unscrewing it or prying it out with a screwdriver. You can get a replacement gasket at a hardware store or order one from the manufacturer. Before installing the new gasket, soak it in hot water to make it more flexible.
Check Sprayer Arm for Clogs – Over time food particles, mineral deposits and other debris can clog the holes in the sprayer arm. It is essential to clean these small holes from time to time to enable the dishwasher to work more efficiently. Remove the sprayer arm periodically and soak it in warm vinegar for a few hours to loosen any obstruction. Then clean out each spray hole with a pipe cleaner.
Check and Clean Screens and Filters dishwasher how to 2
Your dishwasher should have a screen or filter located near the bottom above the food drain to catch any large food or debris; these need to be cleaned out at least every other week to avoid clogs. Your dishwasher owner’s manual should provide instructions for removing and cleaning the filter. If the filter has holes, it needs to be replaced in order to prevent harm to other parts of the dishwasher. Also, inspect and clear out any food or debris that might be trapped in the food drain.
Be Smart/Turn off the Power Before You Start – Dishwashers have built-in water heaters and motors which can consume a lot of electricity; couple that with all the water a dishwasher uses and you can see how improper wiring and connections can put you at risk for fires, power outages or electrocution. Dishwashers should always be plugged into a grounded outlet or wired direct and your main socket must be rated adequately to handle the large load required by most dishwashers.
Buy a Repair Kit – Notice any exposed metal, nicks or corrosion on your dish racks? These can cause rust and stains to dishes and dishwasher walls. Most hardware stores sell repair kits that allow you to quickly mend worn or chipped plastic.
Make Sure Your Water Starts Hot Enough – Set the thermostat on your water heater to 120F (50C). Water colder than this won’t do a good job cleaning and water that is hotter could scald.

* Turn off the power at the circuit-breaker before doing any work on your dishwasher!
Keeping Your Dishwasher Odor-Free
odor freeWhen properly installed and regularly used, dishwashers rarely develop problems with bad odors. Most dishwasher odor is related to food which has collected somewhere in the dishwasher and can’t be easily removed.
Your first line of dishwasher odor defense is to always be sure to remove large food particles, non-dissolving and sticky food substances from all dishes before you put them in the dishwasher. Also, visually inspect every nook, cranny and corner of the dishwasher to see if any hidden food has wedged somewhere out of view. Other dishwasher odor tips:

Run the Garbage Disposal Before Starting the Dishwasher – The dishwasher drains into the same pipe as your sink, so that drain must be clear.
Suspect a Drain Clog – A foul-smelling dishwasher could be the first sign of a clog somewhere in your kitchen drain. If waste water accumulates at the bottom of the dishwasher and drains slowly…or if your garbage disposal and kitchen sink tend to back up when the dishwasher drains — this could be further evidence of a clogged drain. If so, clear the drain as soon as possible.
Disinfect and Deodorize – Run a cycle with a quart of vinegar to safely clean the tub and pump. Also, put a scoop of Kool-Aid or Tang powdered drink mix in your dishwasher to gently scour the interior walls and add a clean, fresh scent.
Check Your Water Softener – If not properly balanced or maintained, water softeners can cause foul odors in the water supply.

Keeping Your Dishwasher Thoroughly Clean
how to clean dishwasher
Start with an Old Toothbrush – Dip a small brush, such as an old toothbrush in hot soapy water and start scrubbing. Making sure you get into all the crevices, scrub the area around the rubber seal on the door. Don’t forget the bottom and the door hinges

Soft Abrasive Cleanser – A soft abrasive cleanser may be needed to remove dried and baked on grime.
Sponge & Hot Soapy Water – Dip a sponge in some hot soapy water and wipe off the gunk you loosened with the brush and cleanser on the door.
Wipe Down Gaskets & Door – Using a clean wet sponge or cleaning rag, wipe down the gasket and the door.
Remove Dish Racks – Remove the dish racks and set them aside.
Wipe Down Inside Walls – Wipe down the inside walls and, tough as it may be, get into hard-to-reach corners with a sponge soaked in the hot, sudsy water.
Wipe and Clean Drain – Wipe around the drain to be sure there are no hard chunks that can plug it up, possibly resulting in damage to the pump.
Use White Vinegar – Replace the dish racks and put a dishwasher-safe cup filled with plain white vinegar on the top rack. Using the hottest setting available, run the dishwasher through a full cycle with nothing inside except for the cup of vinegar. The vinegar washes away the loose, greasy grime, sanitizes, and also removes the musty, stinky odor.
does it workUnsweetened Kool-Aid or Lemonade Mix – A packet of unsweetened Kool-Aid or lemonade mix dumped into the soap cup may be substituted for the vinegar. Other flavors might work, but they could also stain the inside of your dishwasher.

A Cupful of Baking Soda or Powdered Ascorbic Acid – A cupful of baking soda or powered ascorbic acid sprinkled around the bottom of the tub freshens and brightens the machine and removes stains. Again, run the machine empty on a short cycle.

Keeping Your Dishwasher Energy Efficient
dishwasher energy efficientWe measure the energy efficiency of our car in miles-per-gallon. Dishwasher efficiency is measured by a term called the energy factor.
The energy factor is based on the number of cycles per kilowatt-hour of electricity. Today, the minimum allowable energy factor rating for standard capacity dishwashers is 0.46.
The higher the number, the more efficiently your dishwasher is using energy. These tips can help you improve your dishwasher’s energy factor and get good cleaning results:

Watch Your Water Temperature – The single most important factor in getting good results is hot water. The best way to improve the energy efficiency of a dishwasher is to reduce the amount of hot water needed to clean your dishes. About 80% of the total energy used by dishwashers goes towards heating the water. Too cool won’t clean your dishes well; too hot wastes energy. Most dishwasher manufacturers and detergent companies recommend setting the water temperature at 130 degrees Fahrenheit; this will effectively remove all food particles and residue without wasting energy. Place a thermometer inside the dishwasher to determine if the temperature is appropriate. If above or below 130 degrees, adjust your hot water heater.
Run Hot Water in the Kitchen Sink – Running a bit of hot water in your sink before running the dishwasher will get cleaner dishes if the water starts hot.
Avoid Using the Delay Cycle – This fills the dishwasher tub with cold water for the first few cycles, meaning the dishwasher will have to work harder to warm the water up.
Avoid Using the Heated Dry Setting – Dishes can air dry without the use of heated air. This can produce substantial energy savings.
Run Full Loads Only – Running only a portion of a load will use the same amount of energy and water as a full dishwasher load. Don’t be wasteful.
Avoid Pre-Rinsing of Dishes – Scraping off leftover food is sufficient; a good dishwasher should be able to loosen and remove most food particles, even sticky ones. Soaking or pre-washing dishes is only necessary when something is burned or baked on.

Dishwasher Detergents
dishwashing detergentsWhat you put into your dishwasher significantly affects your dishwasher’s performance, so here are some Do’s and Don’ts:

Use Detergents Specifically Designed for Dishwashers – Hand washing dish detergents and other soaps must NEVER be used in dishwater. They are not formulated to clean dishes in a dishwasher. And they will produce large amounts of foam, suds and bubbles which will leak from the dishwasher and spill onto the floor. Use detergents that are specifically meant for DISHWASHING ONLY.
Choose Powders Over Gels – Powder detergents are usually a better choice than gels. Gels often contain chlorine bleach which car dissolve seals and gaskets. Gels don’t work well in hard water. Gels can clog the detergent dispenser which can impede cleaning performance. And gels tend to leave more spots, film and cloudiness on glassware. For best results, we recommend using a powdered detergent or tablets.
Don’t Buy Dishwashing Powder in the Super-Size Box – It may seem cost-effective to purchase large economy-size boxes of dish detergent powder, but these products actually have a limited shelf life. Once you open that box, you only have about two weeks to use it; once air hits the powder, its cleaning effectiveness is greatly reduced. Stick to regular-size boxes which can be consumed in a two-week time period.
Avoid Cheap Products – Make sure that the word DETERGENT appears on the box. Some inexpensive and non-name powders contain inferior cleansers; some even contain sand! These products should be avoided to prevent wear and damage to dishes and the dishwasher itself as well as sediment build-up.
Give us a call with any questions Charlotte plumbing & repair 704-394-5252- www.charlotteplumbingsvc.com